Happenings in the Bee Yard
Before we start talking about setting up a bee yard and the hives that will house your colonies, I have news to share from my Bee Yard. This week I was vacationing on the Isle of Palms just north of Charleston, SC. But, all week, in the back of my mind, I was wondering if the new queen had emerged in the queenless hive, how was the nuc doing, and what was going on with the incredibly disappearing queen in the stronger hive. So naturally, I couldn’t wait to inspect the bees Saturday morning.
There were some definite discoveries worth mentioning. As expected, both of the top hive feeders on the 10-frame deeps were nearly empty. So, that made removing them much easier this time around.
Removing a full top hive feeder requires careful balance to keep from spilling a load of sugar water over yourself and your hives. And sometimes, your workers will decide that they absolutely must build comb up the central opening to the feeder. When they decide to do this, they can be quite obstinate in recreating it every time you clean it out.
The Strong Hive
The queen in the stronger hive has eluded me no longer! Determined to find this queen, I opened the hive this morning with a singular purpose. During the inspection, I found drawn comb on at least 8 of 10 frames requiring me to install a second deep.
I searched the frames, finding a couple full of honey and a solid brood pattern including significant numbers of eggs, young larvae, older larvae, and capped brood. Finding a few uncapped queen cells , I destroyed them to keep a possible swarm from developing.
Working back through the frames on a second pass, I finally saw my quarry!! Oh but is she ever a sneaky lady and now I know why I was missing her.
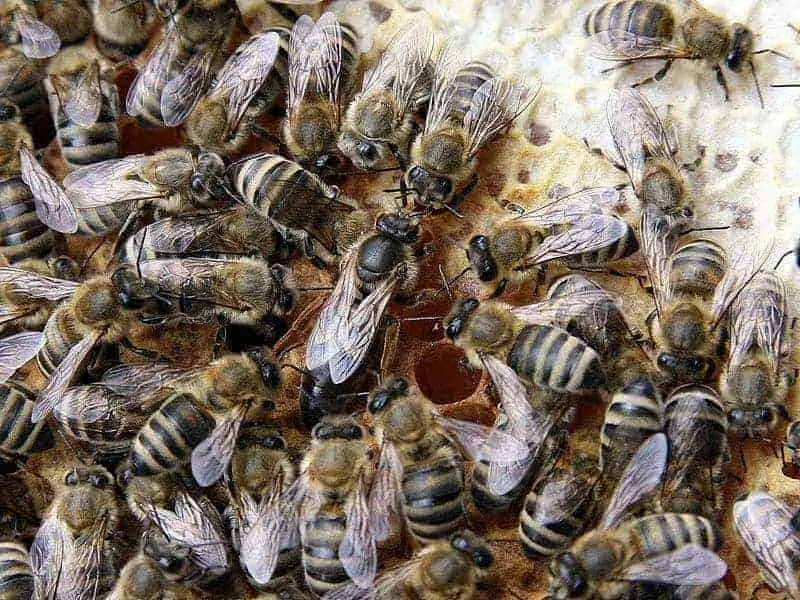
This queen is almost an ebony black and looks very much like a Carniolan queen. I was looking for a lighter-colored queen more closely attuned to an Italian in makeup. While I was watching her (with quite a bit of excitement), she actually dipped her abdomen in a cell and laid an egg. That is a first time experience for me! Carniolan queens are exceptional at growing colony populations quickly.
I completed the inspection of this hive, reinstalled the top hive-feeder and shut the hive up. The inspection took longer than I would like but it was worth it to finally find the Queen.
The Weaker Hive
After my success in the stronger of my two hives, I opened the weaker hive hoping to find a newly hatched and mated queen. I did find an opened queen cup with its occupant gone but I did not find a queen on the frames. Asking fellow beekeepers, I did learn that an unmated queen will look different than a fully mated and egg-laying queen. One capped queen cell remains, as well as a couple of uncapped in this hive. There are no eggs or young larvae. So, if there is no queen by next week, I will have to requeen this hive.
A queenless hive makes for some really ornery worker bees. The slightest wrong move and they will headbutt your veil, sting your gloves, and generally be surly.
The Nuc
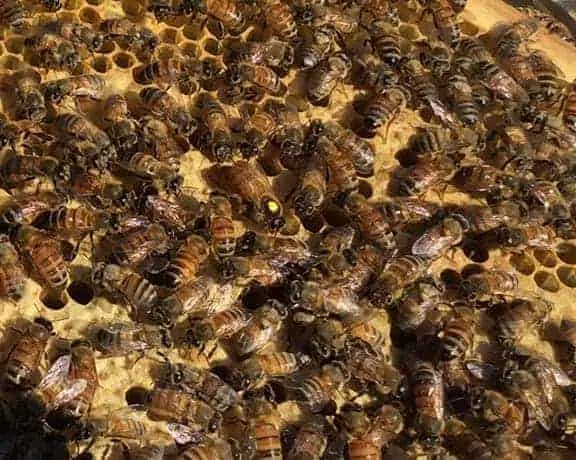
After completing my work with the full-sized hives, I turned my attention to the nucleus hive containing my marked queen. Inspecting this smaller hive goes much quicker and, given the smaller number of bees, it is much easier to see everything that is going on with the workers and the queen.
Last week, there was a small number of eggs present but not an inordinate number. Looking over the frames, I found a much larger number of eggs and some new young larvae. I also got the second treat of the day when I looked on the brood frame transferred from my weaker hive. There were close to 8 baby bees chewing through the cap on their cells. I was able to wait long enough to see one of the babies emerge from its cell. They are really quite fuzzy when they first emerge.
I got one unexpected surprise looking at the brood pattern for this small hive. One cell (and only one cell) had the tell-tale sign of a laying worker. I will have to keep a close watch on this to see if I can discover the culprit. It could be that the other workers discovered her and have already taken care of the problem.
[pullquote align=”normal”]“…The world was really one bee yard, and the same rules work fine in both places. Don’t be afraid, as no life-loving bee wants to sting you. Still, don’t be an idiot; wear long sleeves and pants. Don’t swat. Don’t even think about swatting. If you feel angry, whistle. Anger agitates while whistling melts a bee’s temper. Act like you know what you’re doing, even if you don’t. Above all, send the bees love. Every little thing wants to be loved.” ― Sue Monk Kidd [/pullquote]
Setting Up the Bee Yard
Spacing and Positioning Your Hives
Spacing Your Hives
Before you place your hives in your bee yard, you need to think through how much space you will need between and around the hives in order to work unimpeded. Ideally, give yourself space on both sides of a single hive to work with it from either direction.
If you are also going to install an electric fence, then make sure that you offset the electric fence so you don’t inadvertently back into it while working your bees. The electric fence is a great thing if you have to worry about bears visiting your bee yard for honey, but if you forget that the fence is there while looking at your bees you will experience a nasty shock!
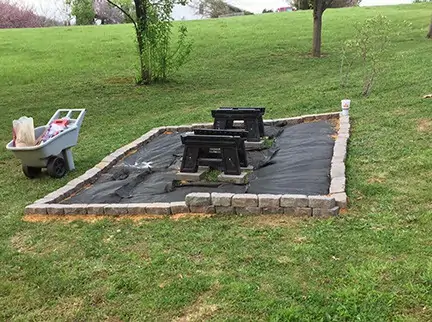
Almost any major home improvement store sells pavers. I purchased eight of these for $1.41 each. In the mountains of western North Carolina, there is truly not much in the way of flat land. The realtors term it “rolling hills” so this requires use of a level, trial and error, and patience. It helps if you have your hive stand present so that you can check the leveling at this point.
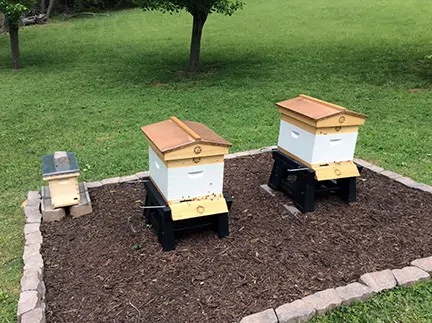
After setting the first set of four pavers for the first hive, I set the second set a little over two feet from the first set giving me buffer space between the two hives to work the bees (spacing between the two hives is 27 1/4 inches). At this point, I set the hive stands in place and went ahead and worked to level the hives. Remember you don’t need to be perfectly level. You do want a small tilt to the hive for water drainage purposes.
Positioning the Hives
So let’s participate in a test, new beekeepers!
What direction should your hive’s front be facing? If your ready answer was southeast, you get a gold star! The best positioning for a honeybee hive is facing southeast preferably free from early morning shade. You want your workers to warm up and wake up early in the day and get to work finding pollen, nectar, and water.
In some areas of the country, you will want to avoid too much shade as this can create problems with small hive beetle infestations. Fortunately, I have the perfect location, which allowed me to position the hives directly southeast with slight early morning shade and some welcome afternoon shade. That afternoon shade will be beneficial to the bees as even in the mountains of western North Carolina we get quite hot and humid by July and August.
Starting to Build the Yard
Deciding about the Dimensions of Your Bee Yard
With the hive stands positioned, I began working on outlining the bee yard borders.
I gave myself roughly two feet of space around the front and back as well as the outer sides of the hives. I marked off roughly 81 square feet for the bee yard (9 feet by 9 feet). When you are building a bee yard, you really need to cut down on vegetation immediately surrounding the hives. Would you want to chance a weedeater right in front of the hives? What could possibly go wrong!?!
Controlling Unwanted Vegetation Under and Around Your Hives
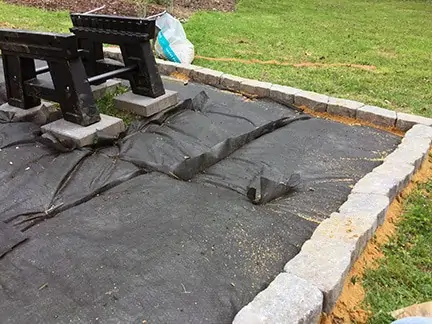
To remove the possibility of vegetation growing up immediately around and under the hive, I purchased a premium quality landscape fabric. Since I’m an avid gardener, this task did not even phase me. I’ve become expert at preventing weeds in my gardens without chemicals.
It only took about 45 minutes to have the landscape fabric in place all around the two hive stands. There was not easy way to install landscape fabric underneath the hive stands as the dimensions made for no great way to secure the fabric.
So what does an expert gardener do? Use a layer of newspaper.
I learned this trick early on in my gardening experiences at this house. I absolutely detest large amounts of landscape fabric because it means cutting it every time you want to add more plants.
A great alternative is either newspaper or cardboard. A layer of two or three pages of damp newspaper, covered in a two to three inch layer of mulch, will smother any live vegetation. Even more useful, the newspaper will decay over time but remain in place long enough to kill out the vegetation. Newspaper was the perfect solution. It was easy to fold and fit into the smaller areas under the hives.
Remember those rolling hills I spoke of in the mountains? When you’re working with hives on a slight incline, you need a retaining wall to hold whatever groundcover you select. Otherwise, your groundcover will wash out of the bee yard and down into your backyard during a rain storm.
I chose Flagstone Ashland Retaining Wall Block to build a one-level retaining wall around the edges of the bee yard. These retaining wall blocks cost $1.28 each which represented one of the costlier pieces of my bee yard build.
Finally, I needed to select a groundcover to place under the hives. If you check around, beekeepers use lots of different materials for this purpose. I decided to make the bee yard blend in with the rest of my gardens and use a dark brown mulch.
Building a Bear Fence (BEARS! Oh My!)
In some regions, bears represent a menace to honeybees and beekeepers. It only takes one bear to ruin you and your bees day.
In western North Carolina, we have black bears. Black bears are just like any other bear – they love honey! In my area, it isn’t unheard of to hear of a black bear wandering onto your property, climbing a tree, and taking a nap.
One bear can destroy a bee yard, scattering equipment, breaking equipment and destroying the colonies inside. Although I have not built my bear fence yet, I already have the materials for my fence. Let’s look at what you will need to build an electric fence to prevent bears and other pesky varmints from pestering your bees.
Electric Fence Charger
Unless you want to run electricity from your garage or house, you will want a solar electric fence charger. There are many manufacturers of electric fence chargers. I encourage you to shop about for the one that fits your budget.
I examined a number of different options and ended up choosing the Deluxe Field Solar-Pak 6 model, manufactured by Parmak. Unless you are building a huge bee yard, a 6-volt charger will be more than sufficient to deliver a few thousand volt shock to any varmint that dares to approach your hives.
You will also need a mount for the electric fence charger. The choice of a mount will vary depending on whether you are using wooden posts or t-posts. A basic t-post mount requires attaching a wooden board to the mount and then securing the fence charger to the wooden board. I chose a t-post mount which is cheap and readily available on Amazon.com.
Other Necessary Equipment
An electric fence requires numerous pieces of equipment, including the following:
- Posts
- Insulators to thread the wire around the fence posts
- Electric Fence Wire
- Gates
- Grounding Rods
- Underground wire to connect the grounding rods to the ground connector on the electric fence charger.
I chose 6-foot step-in steel t-posts for the fence posts. To thread the electric wire around the fence posts, I chose plastic t-post clips. These clips will secure the wire and help keep it taut.
The fence wiring for an electric fence needs to be 15 gauge or a greater diameter. Keep in mind that a lower number indicates a greater diameter i.e. 12 gauge has a greater diameter than 15 gauge. I chose Fi-Shock aluminum wire which comes on a 1/4 mile roll. Fi-Shock also manufactures a 2″ extender insulator. Insulated steel grounding wire must be buried between each of the grounding rods. A 12.5 gauge insulated steel wire is sufficient for this purpose. It comes in rolls of 50 feet.
Gates do not need to be anything extraordinarily complex for a basic electric fence. Fence connections can be fashioned with a plastic or rubber gate handle and the aluminum wire. The gate handles have conducting aluminum running through the handle. Two or three of these gate handles is more than enough for a typical bee yard fence. These gate handle are pretty cheap at $3.00 apiece. You can purchase them at any home improvement store or online.
For an electric fence charger of this capacity, you will need three six-foot grounding posts hammered into damp ground spaced ten feet apart. Improper grounding will mean that your electric fence will not function properly and not deliver the maximal shock when an animal touches the fence. Grounding rod kits are available online.
Coming Next Week
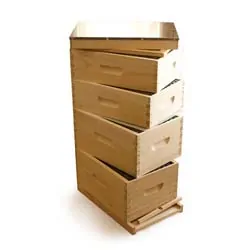
Given the length of this post, I have decided to take up the setup of a Langstroth hive in its own blog post. Next week, I will walk you through setting up the hive starting with the bottom board all the way to the top cover.
I will also talk about the different options for setting up the hive using deeps or mediums hive bodies.
Until next time, happy beekeeping!