The Most Popular of Beehives
There is little doubt that when most people think of a beehive, they think of a Langstroth, knowingly or otherwise. They might have never heard that name and have no sense of its history, but the Langstroth is well-established as the most iconic of beehive designs, adorning many a photo of the countryside on a hot summer day.
The Langstroth has defied the relentless march of so-called progress for over 150 years, by retaining its position as the most common beehive. This is not due to beekeepers being ignorant of new and fancy developments in “beehive technology”. Rather, the Langstroth retains its position thanks to one simple truth – it does what it attempts to do very well indeed!
An important note about this lesson. This lesson focuses on the “what” – the design and common components of the Langstroth box. For each option the Langstroth offers, the beekeeper faces a decision. An example is the use of deep, medium, or shallow boxes (described below). These are described below, but that still leaves the decision of why to use each of these. Issues such as these (the “why”) will be covered in separate lessons, with this lesson intended to position you to understand the decisions you will need to make later.
Design Overview
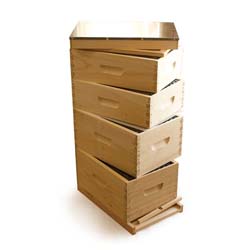
The Langstroth can be considered to be made up of three distinct sections (with the purpose of each component discussed below).
- Lower section: The base on which the boxes rest includes a bottom board, featuring an entrance through which bees can come and go. The whole hive is often placed on a purpose-built hive stand, although other ad-hoc options exist too.
- Boxes: This is where the action happens inside the hive. Brood, honey, pollen, propolis and, of course, bees are all housed inside one or more boxes. This is what gives the Langstroth its expansion characteristics, allowing the beekeeper to add new boxes to support the growth of the colony.
- Upper section: The top of the hive is comprised of an inner cover, sitting on top of the uppermost box, plus a top cover to cap the entire structure.
Individual Components
Bottom Board
The bottom board is the structure that supports the full weight of the hive and incorporates the entrance through which bees come and go. There are a few different types of bottom boards available, but they are either a solid bottom board or screened bottom board. The latter has features useful when assessing whether mites are a problem and we will be looking at this in some detail in Course 3: A Healthy Beehive.
Boxes
The use of a variable number of boxes in the Langstroth lends this hive design a tremendous ability to expand. It is simple and easy to add another box on top of the existing ones, thus adding considerable volume to your bee’s living quarters.
Due to the size of the boxes and the ease with which new ones can be added, the Langstroth offers the highest honey yield of the three main types of beehives.
Although the Langstroth is something of a standard, you still have many options when it comes to box size, across two dimensions.
Depth
The Langstroth boxes used in a single hive use the same length and width. A traditional box is 16″ wide by 19 7/8″ long.
However, boxes of different depths can be mixed in the same hive, with the following standard sizes available:
- Deep: 9 5/8″
- Medium: 6 5/8″
- Shallow: 5 7/8″
For example, a deep box has the dimensions 16″ x 19 7/8″ x 9 5/8″.
We will look at the appropriate use of each depth elsewhere, but the lower brood box (where bees raise new brood) is typically a deep or medium box.
Frame Count and Depth
Beekeepers also have the choice of either 8 or 10-frame boxes. These will be used consistently throughout a single hive, meaning a hive itself – across all boxes – is either an 8 or a 10-frame hive. However, it is not particularly unusual for beekeepers to have a mixture of both 8 and 10-frame beehives, although the “operational efficiency” of this is questionable.
So, why would one choose a box with only 8 frames, when 10 frames boxes can be used? A fully-laden 10-frame deep box can weigh around 80 lbs! That’s a lot of heavy-duty lifting. This is one reason why many prefer 8-frame hives – it’s easier on the back!
As to the choice of depth and with the reminder that shallow, medium, and deep boxes can be mixed within a single hive, deep boxes are often used for brood and not honey. Even medium boxes can be rather heavy, though (around 50 lbs, with honey).
For the non-commercial beekeeper, handling this weight is often difficult to justify, especially for the older or less mobile beekeeper. Therefore, a common option is to use 8 frame boxes. This reduces the width of the box from 16″ to 14″ and lowers the weight of the box considerably.
Apart from reduced weight and capacity, there is little practical difference between 8 and 10-frame Langstroth beehives. Indeed, because the length of the box remains the same (19 7/8″), the frames themselves are interchangeable across 8 and 10-frame boxes, providing the box depth is the same.
Frames and Foundation
So, within each box, the beekeeper will place rectangular frames. As we have seen, the Langstroth box supports either 8 or 10 frames. Typically, though not always, each frame includes foundation, generally with a wax coating. This is a vertically oriented plane on which bees create comb.
Increasing interest in natural beekeeping means more beekeepers are using foundationless frames, which allow the bees to create their own foundation.
Inner Cover
The inner cover is placed on top of the uppermost box. The inner cover sometimes features a small gap, which provides an upper entrance/exit for the bees, in addition to the main entrance on the bottom board. Inner covers also feature a hole, which is important when using a feeder (yes, more on feeders in a separate lesson!).
A common practice is to place the inner cover on top of the uppermost box, a feeder on top of the inner cover (resting over the inner cover hole), and then an additional box around the feeder, just to protect it from the elements. Then a top cover is placed on top of that box.
Top Cover
The top cover (sometimes called an outer cover) goes…on top! The purpose is very obvious, namely to cover the beehive and protect it from the elements.
A common design is called a “telescoping top cover” since it overlaps the inner cover and hangs down around its edges. This helps keep water from dripping into gaps at the top of the hive.
Accessories
Beyond the core components of the hive, many beekeepers add one or more options. Here are a few of the more common ones.
Stand
In most scenarios, a hive stand is recommended and justified. Doing so has a number of benefits, including raising the hive to a more manageable level for the beekeeper, reducing the chance of dampness from the ground, and making it more difficult for pests to access the hive.
The stand can be a very home-made affair! Many beekeepers use cement blocks or some other sturdy, but readily available materials. However, there are many excellent commercial products available, offering other benefits.
One example is the Ultimate Hive Stand, which is purpose-built for the job, very stable, and incorporates frame holders for use during an inspection.
The bottom line is that for many beekeepers, it is very important to raise the hive off the ground, whether through their own solution or via a commercial product.
Entrance Reducer
The entrance reducer is a highly sophisticated piece of equipment (OK, it’s basically a piece of wood!) and is valuable when first establishing a colony. A small colony will be at a disadvantage if it has to defend the entrance of the hive from robber bees. Before the colony becomes fully established, having to defend the full expanse of the hive entrance could well prove beyond the capabilities of the young colony.
While the advantages are clear, the disadvantage is that things can get a little crowded, at least when the entrance reducer is at its most restrictive gap.
Queen Excluder
Beekeepers have a knack for naming things! The aforementioned entrance reducer reduces the entrance. Likewise, the queen excluder… excludes the queen! But why and what is it?
A grid of either metal or plastic is placed on top of the uppermost box in which the queen is to be allowed to roam. The holes in the grid are just large enough to allow workers and drone bees through, but too small for the queen to pass through. Therefore, the queen is excluded from the boxes above the queen excluder.
There are various philosophies on the use of queen excluders and many beekeepers simply never use them. In fact, because they do slow down worker bees – those very bees that are creating honey! – the queen excluder is sometimes mischievously called a “honey excluder”.
We will cover the use or non-use of a queen excluder in a separate lesson but PerfectBee does not feel they are justified in the first year of a hive, as you should make life as easy as possible for your bees. Here’s a video that illustrates how this can at least slow down your bees.
Product Choices
As with many aspects of beekeeping, there are numerous options available when choosing a Langstroth hive. These relate to longevity, handling, strength, aesthetics, costs, and other factors.
Longevity
You have several choices of wood when selecting a Langstroth, each with different characteristics of durability and longevity.
The most popular wood used for Langstroth hives today is pine. This is a perfectly effective choice, but since it is not resistant to rot, it is highly advisable to paint pine hives, to increase their longevity against the elements. Typically, hives are painted with a light color, which helps keep the hive cooler in hot weather.
Western Red Cedar is considered an upgraded choice of wood, for a number of reasons, including better resistance to rotting. This means that it is not so important to paint a Western Red Cedar beehive, allowing for a more natural look. It is quite common to treat with Tung Oil, just to offer a layer of protection and to bring out the natural wood grain.
Ease of Handling
The Langstroth is well-respected as a hive offering the potential for a good deal of honey. With that, though, comes weight, as discussed above.
Aside from considering 8 frame boxes, Western Red Cedar offers another weight-reduction option since it is lighter than pine. This choice of lighter wood can ease the effort necessary considerably during a hive inspection.
Aesthetics
This is obviously somewhat more subjective, but if you prefer a natural wood look for your hive then Western Red Cedar has the advantage that it need not be painted. In fact, the application of Tung Oil brings out the wood grain in a quite beautiful way.
By comparison, a coat or two of paint on a pine hive leaves a very different look to the finished hive.
Cost
Pine is something of a standard for Langstroth hives and this results in very economically-priced beehives and boxes. For those on a tight budget, pine is a good option.
Western Red Cedar, by comparison, has the advantages of not needing to be painted, looking more attractive, offering greater longevity and a lower weight. But, as with any premium product, with these advantages comes a higher price.
It should be noted that, assuming the visual look of the final hive is not a priority, it is feasible to start with a cedar beehive and then add boxes made with either pine or cedar.
Langstroth Hives from PerfectBee
The PerfectBee Signature Collection of beehives features choices of wood, each from FSC-certified sustainable sources. This means they originate from forests strictly audited to promote growth, protect ecosystems, protect indigenous rights, support surrounding communities, and prohibit illegal logging.
Summary
Pros
The Langstroth design has a number of important benefits, including:
- Expandability: The use of boxes allows the beekeeper to easily extend the beehive by adding space
- Interchangeability: The Langstroth standard defines the dimensions of each component, with manufacturers worldwide following these. It is therefore not unusual to build a beehive with components or options from various suppliers
- Price: This consistency across manufacturers brings economy of scale and this has brought prices of Langstroth hives down to very reasonable levels
- Familiarity: Visit any beekeeping club and you will find beekeepers using the Langstroth, meaning the sharing of information and opinions is assured
- Honey Yield: Of the three main types of beehives, the Langstroth can generate the highest honey yield, due to its sheer dimensions as well as the option to add boxes easier
Cons
With these benefits come some challenges:
- Weight of boxes: Even 8-frame boxes can be heavy when full of honey, which can be challenging to some beekeepers
- More cumbersome inspections: When you need to check the brood box, you potentially have a lot of lifting to do (removing and replacing all boxes on top of the box you wish to inspect). This is not merely a weight issue. If you have a brood box beneath two boxes you have to lift the boxes four times (twice to remove, twice to replace).
- Aesthetics: Although this is obviously subjective, some consider the Langstroth design to be less easy on the eye